Booting Cortex M from scratch
The Magic Before main()
If you are anything like me, you have landed here because you are wondering about all those files generated by the IDE and how you can edit and use them to your advantage, or perhaps simply to understand what they are and what their purpose is.
No matter your reason for being here it is safe to say that understanding those files and how your microcontroller gets to main will only make you a better engineer/student/hobbyist because not every project lends itself to an IDE.
Imagine a huge project with multiple dependencies and multiple binaries that need to be merged etc….
Messing around with all of that in an IDE is actually more trouble then maintaining a Makefile yourself, not to mention IDE and their “updates” can break things and then you are in a place where you have to keep a certain version of something around just for compatibility.
I will only explain the sequence of events that occurs at boot from a firmware developer’s perspective, meaning I will not go into detail about voltages and power sequencing. We will write the necessary files to build a project completely free of an IDE.
This may not be an exhaustive tutorial on every aspect of linker scripts, Makefiles, startup files but it will be more than enough to get you to main.
Furthermore there are some different things happening in different Cortex cores not to mention different boot modes. For the sake of sanity, clarity and brevity I will discuss the normal boot process of a Cortex M4.
Just because we will not be using an IDE does not mean we do not require some ready-made tools like compiler, linker, GDB etc… But I will discuss those requirements in the next part.
Get in loser! We’re going coding!!!
ARM Cortex Power Up Sequence
At power-up, the processor loads the Stack Pointer (SP), typically the Main Stack Pointer (MSP), with the value stored at address 0x00000000. This value usually represents the top of your RAM region.
But why the top address?
The MSP is located at the top of RAM because the stack is a full descending stack that grows down, so to speak.
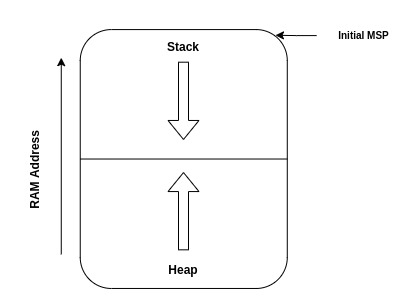
From the highly advanced image above only available to industry insiders, we can see that the stack mechanism grows down towards the lower address while the heap memory space grows upward. Both of these mechanisms grow dynamically. Note that your application may or may not require heap allocation. But you always need stack space.
Next, the processor reads the value at address 0x00000004 and loads it into the Program Counter (PC). This value is intentionally set to be the address of the reset handler, which is the entry point of your application after a reset. As a result, the first instruction to be executed is the reset handler, which sets up the necessary environment before smoothly transitioning to the main function.
ℹ️ Info
The next value is0x00000004instead of0x00000001because the Cortex-M uses 32-bit addresses which are 4 bytes wide, so incrementing to the “next” address is essentially 4 bytes away.
How do these values get there?
How do you program those values if the MCU needs to be running for any of your code to even work? Is this a chicken and egg scenario? Two words, my friend: vector table. Here’s another two words: linker script. And two more: startup file.
These three components are the key pieces we need to write by hand to get to main. Of course, the devil is in the details, and other files are necessary, but we won’t be writing those by hand. These include the device header file with all the register definitions, as well as some CMSIS files relevant to the core registers, provided by ARM. Some of these files are thousands of lines long and are autogenerated by the MCU vendor and ARM.
Environment setup
Next, we’ll gather the necessary components, such as the compiler, documentation, and those header files from ARM and the MCU vendor. Don’t fret—this may sound complicated, but it’s not. ARM MCUs are relatively easy to get up and running, and we won’t even need to touch assembly if we don’t want to. And we won’t.
I like to jump into things and learn as I go so I’ll do the same for you. ‘ll explain what is necessary when it becomes relevant. However, I also don’t explain simple things like how to extract a file or how to add paths to your system variables, this can be googled.
Add path to windows environment
I am going to proceed under the assumption that you have already installed one of the following: STM32CubeIDE, STM32CubeMX, or STM32CubeCLT. These software packages from STMicroelectronics come bundled with their own versions of OpenOCD and the ARM GNU Toolchain, both of which are specifically tailored to work seamlessly with STM32 microcontrollers.
Now, you might be wondering why these packages are relevant, especially if we’re not using the integrated development environment (IDE) itself. We need OpenOCD and ARM GNU tools to compile and debug our application. When you’re working with a newly released STM32 chip, the publicly, or mainstream, available versions of OpenOCD might not yet support it. In such cases, the configuration files and toolchains provided by STMicroelectronics in their software packages are invaluable, as they ensure compatibility with the latest STM32 devices. However, this post is about booting a Cortex M MCU that does not necessarily have to be an STM32
At this point, you have three options:
-
Follow the Steps Provided (recommended to follow this post): You can continue with the instructions I will provide, which involve downloading and setting up the required tools independently from mainstream sources. This is fine unless you’re using a new STM32 released yesterday or something, you lucky dog! The good thing about this approach is that you’ll have an OpenOCD version tailored for most microcontrollers, not just STM32.
-
Use the Pre-Installed Tools: Alternatively, if you already have STM32CubeIDE or STM32CubeMX installed, you can skip the downloading steps. Instead, you can use the versions of OpenOCD and the ARM GNU Toolchain included in these packages. To do this, you’ll simply need to locate the relevant files within your installation directory.
-
Use STM32CubeCLT: Download STM32CubeCLT from the ST website. It contains STLinkGDBServer (an OpenOCD alternative) and the ARM GNU Toolchain.
Toolchain setup
First order of business is to download the ARM GNU toolchain, which includes our cross-compiler, linker, and debugger. It also packs a bunch of other helpful utilities. Just a heads-up: these are all command-line tools—no GUIs here. What do you think this is, 2024?
I like to use xPack-dev-tools because they keep up with their work. Download the toolchain relevant to your operating system at the link below and extract it somewhere, I prefer a path close to C:/ on Windows or close to home on Linux
Location from STM32CubeIDE installation:
C:\ST\STM32CubeIDE_1.15.0\STM32CubeIDE\plugins\com.st.stm32cube.ide.mcu.externaltools.gnu-tools-for-stm32.12.3.rel1.win32_1.0.200.202406191623\tools\bin
Next download xPack’s OpenOCD application as well, same procedure for extracting and keeping its path short. Stick to the latest version. If you’re on Linux you can just install it from your apt manager
Location from STM32CubeIDE installation:
C:\ST\STM32CubeIDE_1.15.0\STM32CubeIDE\plugins\com.st.stm32cube.ide.mcu.externaltools.openocd.win32_2.3.200.202404091248\tools\bin
Now that you have the necessary applications to build an executable you should add them to your environment variables / path so that you can call them from the command line no matter what directory your shell is in. You will add the path to the bin folder of openocd and the bin folder of ARM GNU toolchain.
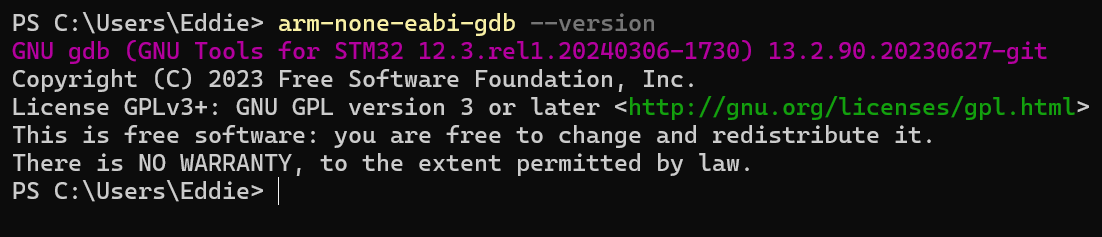
Once you do that open up your shell and type in : openocd --version

Do the same with the ARM GNU tools, note the command for the ARM GNU toolchain is kind of ugly looking and long but thats how it is.
Perfect, I hope! Next you need something pretty to type in, I like to use VSCode because its easy to customize and all the cool kids are using it. So go ahead and download that and get it installed.
We should also install make so we can automate building our project because manually building things is only fun once when reading an online tutorial and then never again.
You can get make from the link below. You should also add its bin folder to your environment path
Next we need to get some premade files like the device header with all the register definition for the microcontroller that will be used. I am using an STM32G071RB Nucleo board. We will also need to grab some CMSIS files made by ARM that describe the Core registers. If you poke around enough you will find some assembly start up files but ignore those since we will write out own in C instead. We can get the files we need from ST’s github page
Do not bother cloning the entire repo just grab the following files; From the following directory on ST’s page you will need
STM32CubeG0/Drivers/CMSIS/Include
- core_cm0.h: This is the primary header file for the Cortex-M0 core. It contains the core definitions, register structures, and intrinsic functions necessary for programming the Cortex-M0.
- cmsis_compiler.h: This file provides the necessary compiler-specific definitions that are compatible across different toolchains. It’s used to ensure that the CMSIS (Cortex Microcontroller Software Interface Standard) code works across various compilers.
- cmsis_gcc.h: Since we are using the GNU ARM toolchain (GCC), this file contains GCC-specific macros and definitions that you’ll need.
- cmsis_version.h: This file contains the CMSIS version information and is generally included in CMSIS projects for consistency.
Usually the CMSIS repo will also link to the specific device addressed by that repo, simply follow the link and head over to the device repo for you chip because we need to get something from there as well.
From the STM32G0 Repo We will grab the device header file because it has definitions for all the registers, this file is generated by the chip vendor and you probably dont want to type this out by hand, heck they dont even do that, these are probably generated from SVD files. Grab the following files:
cmsis_device_g0/Include
- stm32g071xx.h: device header file with register definitions
- stm32g0xx.h: This is the generic header file for the STM32G0 series of microcontrollers. It provides common definitions and macros that apply to the entire STM32G0 family, ensuring that your code can be easily ported across different STM32G0 devices
- system_stm32g0xx.h: This file contains the system configuration functions and setup routines for the STM32G0 series. It typically includes the system clock configuration and other critical low-level initialization code that needs to be executed before your main application can run. Finally below are some helpful links to documentation that will be helpful in this journey.
First up is the manual for ARM GCC which is our compiler, this will help use figure out which flags to pass in order to compile our code for our specific chip. ARM GCC Manual
Next are the reference manual and datasheet for your specific chip STM32G071RB Documentation
Next we finally open up VSCode and start our project.
… stay tuned currently reformating posts and updating the new site layout